
1. The Silent Tragedy: The "60Hz Trap"
This is the most common mistake in the history of PC gaming.
You unbox your new $800 OLED gaming monitor. You plug it in. The colors look great. You jump into a game. You think, "Wow, this feels smooth."
But in reality, you are likely still viewing 60 frames per second.
By default, Windows sets almost all connected displays to 60Hz to ensure maximum compatibility. It does not "detect" that you bought a high-end screen automatically.
Step-by-Step Fix:
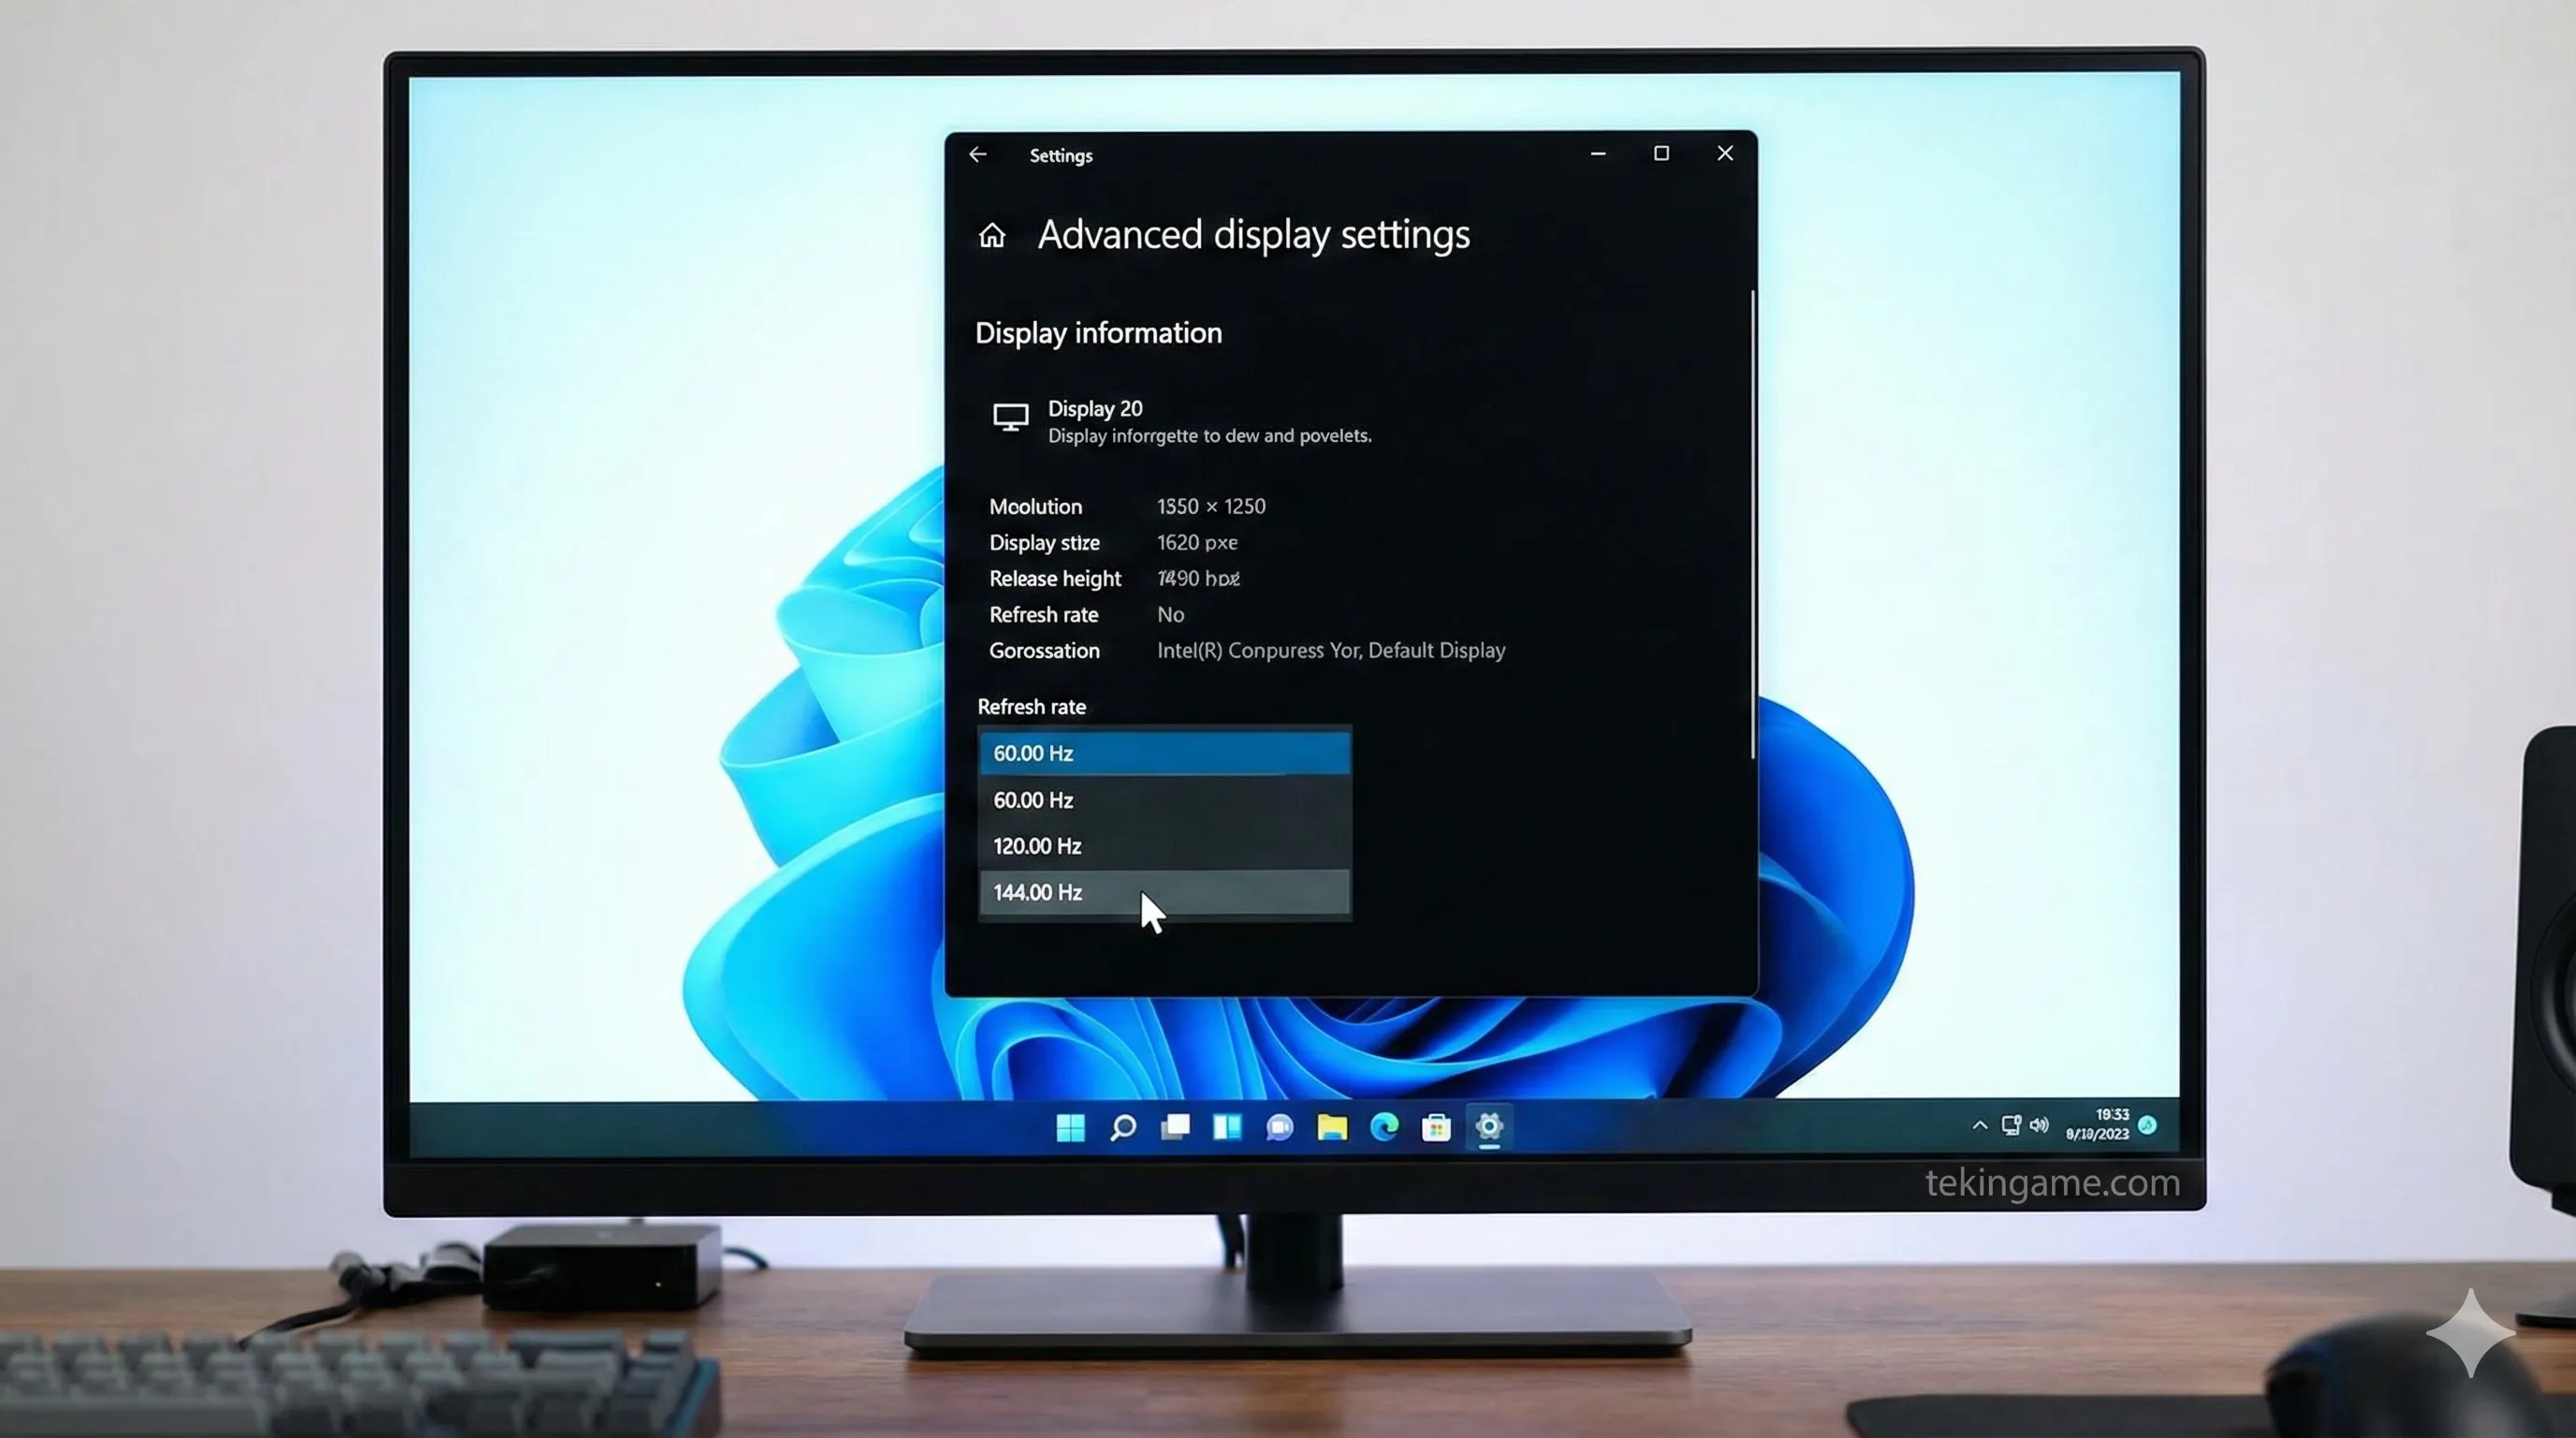
- Right-click on your Desktop and select Display Settings.
- Scroll down to the bottom and click on Advanced display.
- Look at the drop-down menu labeled "Choose a refresh rate".
- If it says 60.00 Hz, take a deep breath. You have been throttling your own experience.
- Click the menu and select the highest number available (e.g., 144Hz, 165Hz, 240Hz, or 360Hz).
- Your screen will flicker black for a second. Click "Keep Changes." Welcome to the real world.
If you bought an OLED monitor today, simply turning on "HDR" in Windows 11 often results in a washed-out, gray image.
You MUST download the free "Windows HDR Calibration" app from the Microsoft Store. Run the test. It creates a custom color profile for your specific monitor, ensuring that deep blacks stay black while highlights pop. Do not skip this!
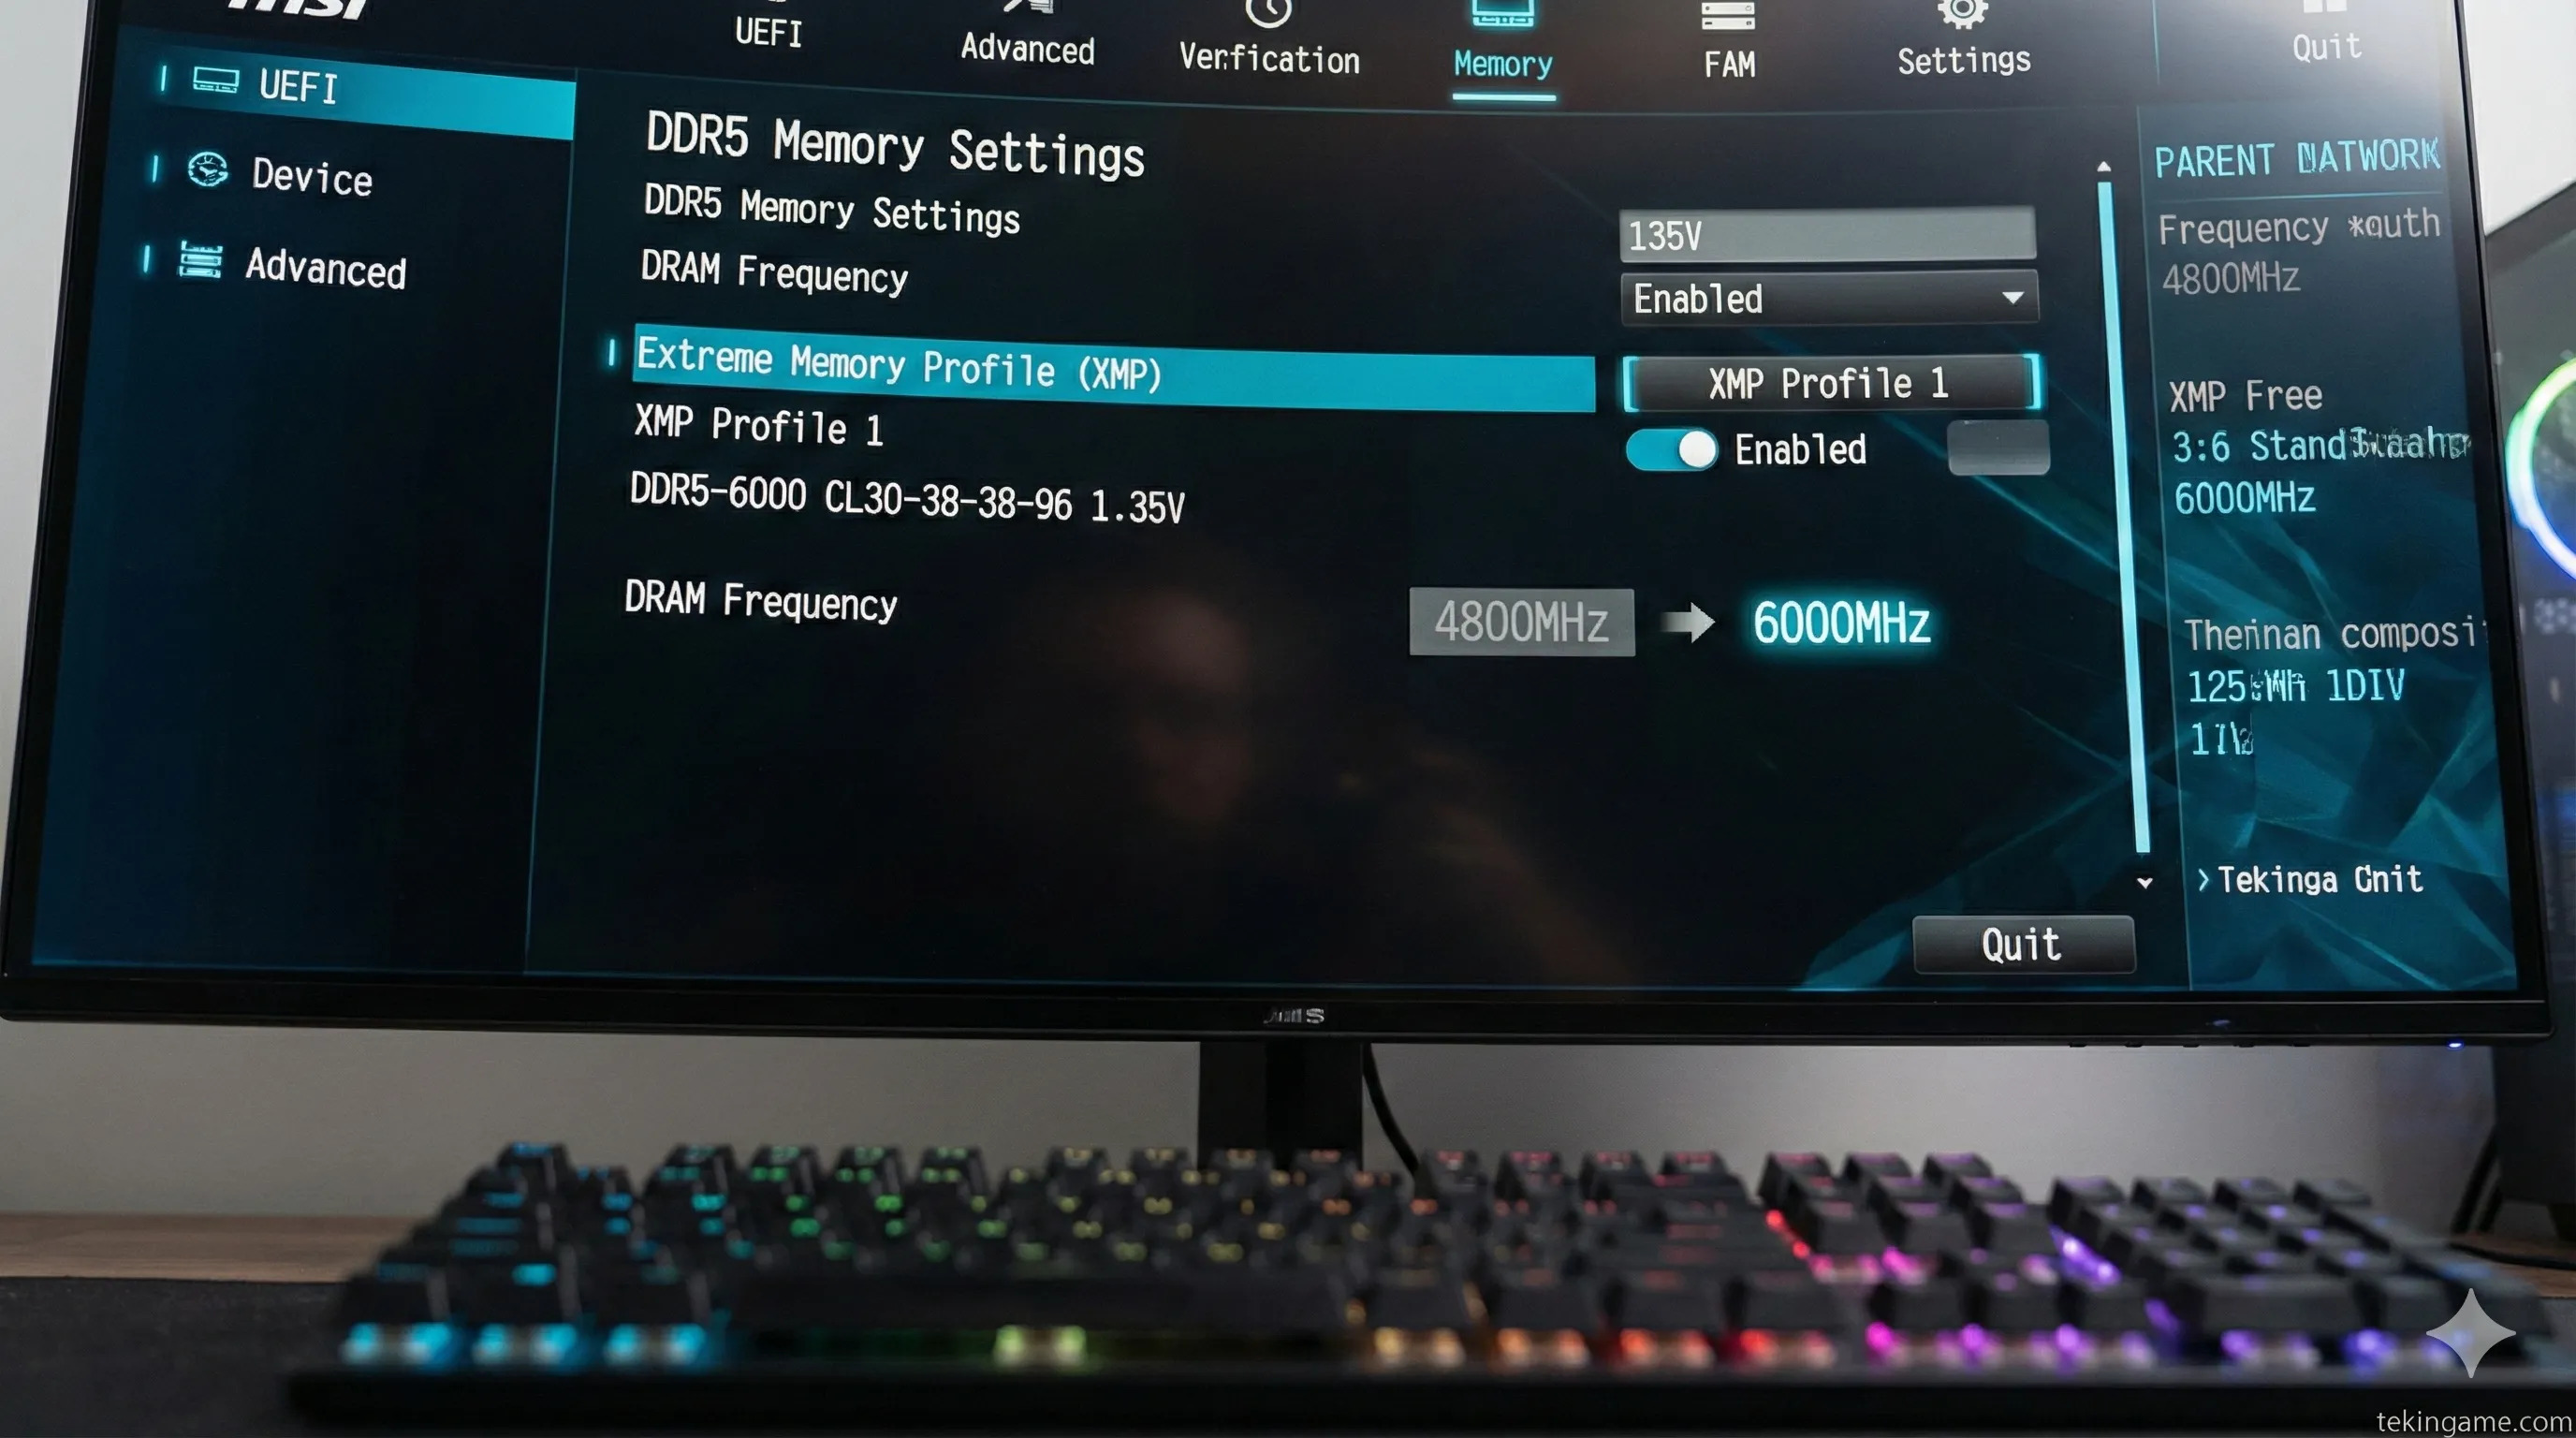
2. The Speed Throttle: Enabling XMP / EXPO for RAM
RAM marketing is confusing. You bought a kit labeled "DDR5-6000MHz."
However, when you plug that RAM into your motherboard, it defaults to the JEDEC standard speed, which is usually a slow 4800MHz. This is a safety measure to ensure the PC boots up successfully.
If you don't tell the motherboard to "unleash" the RAM, it never will. In CPU-heavy games like Call of Duty: Warzone or Cyberpunk 2077, this can cost you 10-20 FPS.
The BIOS Mission:
(Note: BIOS interfaces look different for ASUS, MSI, and Gigabyte, but the terms are similar.)
- Restart your PC and spam the Delete or F2 key until you enter the BIOS.
- For Intel Users: Look for a setting called X.M.P. (Extreme Memory Profile).
- For AMD Ryzen Users: Look for EXPO, D.O.C.P., or E.O.C.P.
- Switch the setting from Disabled to Profile 1.
- You should see the frequency jump from 4800 to 6000 (or whatever speed you bought).
- Press F10 to "Save & Exit".
Did it work? Open Task Manager in Windows > Performance Tab > Memory. Check the "Speed" section.
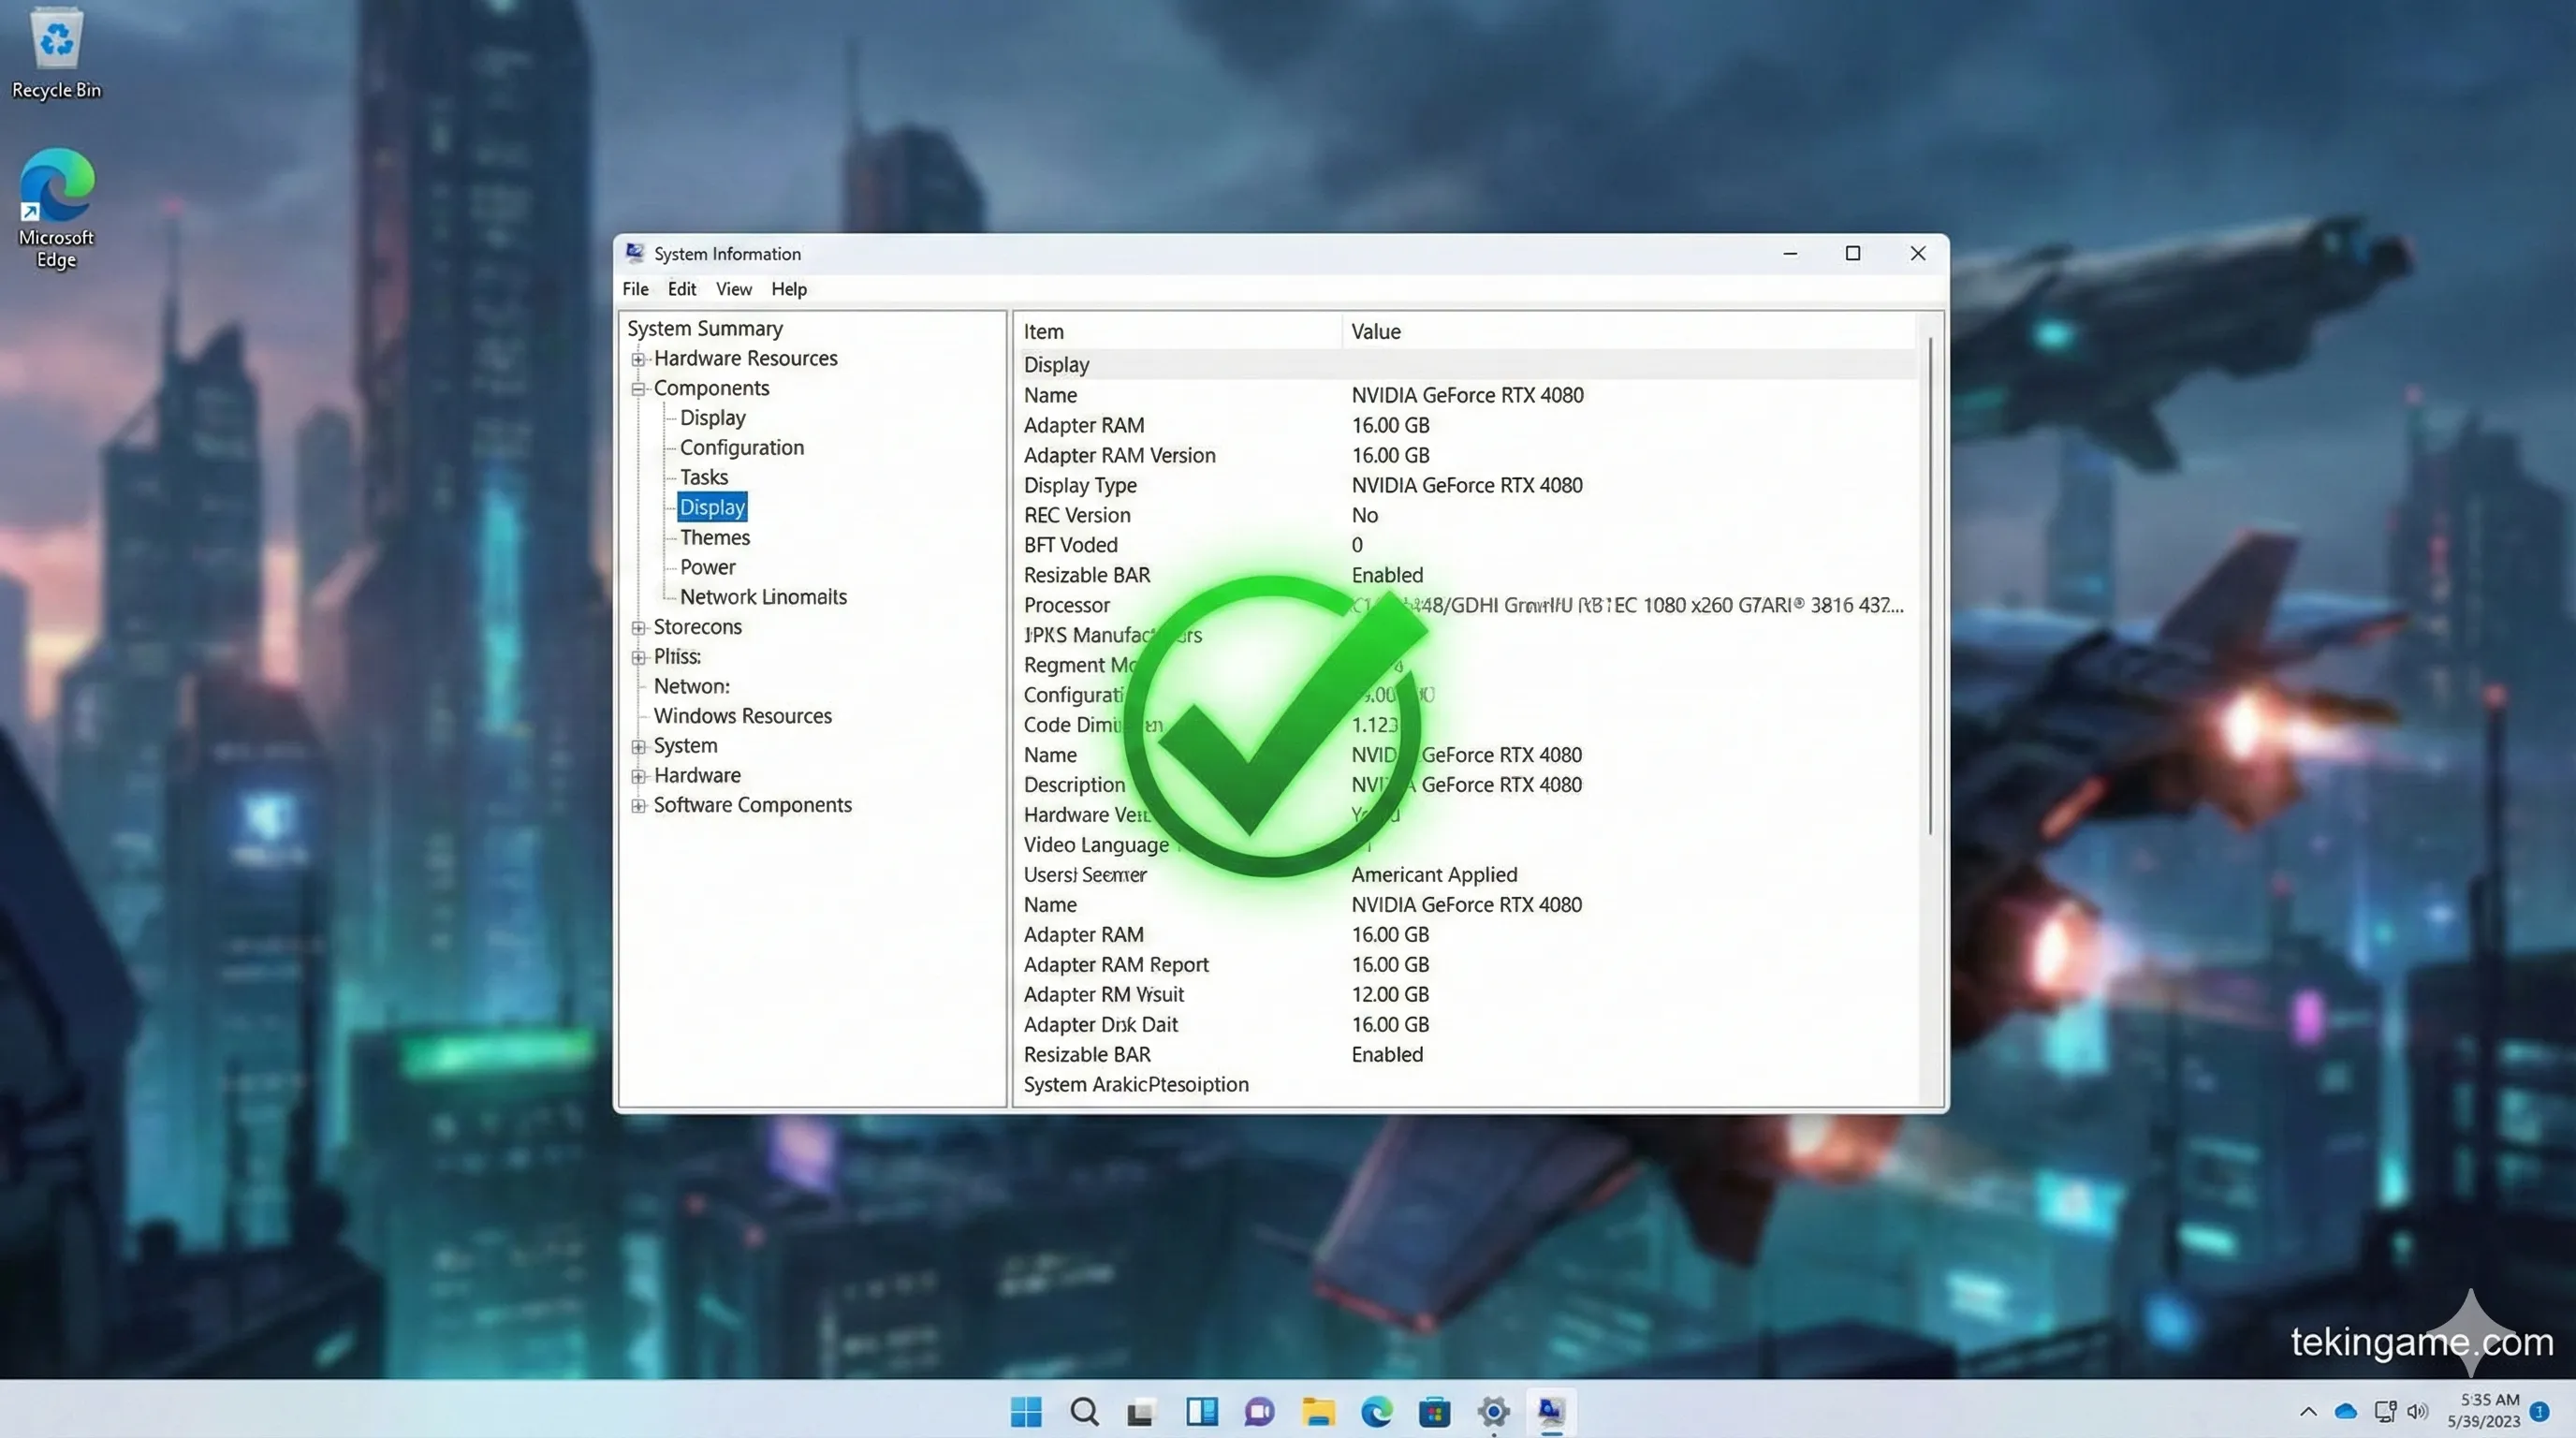
3. The Free Boost: Resizable BAR
For years, CPUs could only access the GPU's video memory (VRAM) in tiny 256MB chunks. It was like drinking a milkshake through a coffee stirrer.
Resizable BAR (Re-Size BAR) removes this limit, allowing the CPU to access the entire VRAM at once. This results in smoother frame times and a free 5% to 10% performance boost in modern titles.
How to Enable (Requires Precision):
This is also hidden in the BIOS, but it requires two steps.
- Enter BIOS (Del/F2) and go to Advanced Mode (usually F7).
- Navigate to PCI Subsystem Settings or Boot menu.
- First, find "Above 4G Decoding" and set it to Enabled. (This is critical. Without this, the next option won't appear).
- Now, look for "Re-Size BAR Support". Set it to Auto or Enabled.
- CRITICAL CHECK: Ensure your "CSM Support" (Compatibility Support Module) is Disabled. Resizable BAR requires the modern UEFI mode to work.
- Save and Exit (F10).
Verification: Open the NVIDIA Control Panel > System Information. In the list, find "Resizable BAR". It should say Yes.
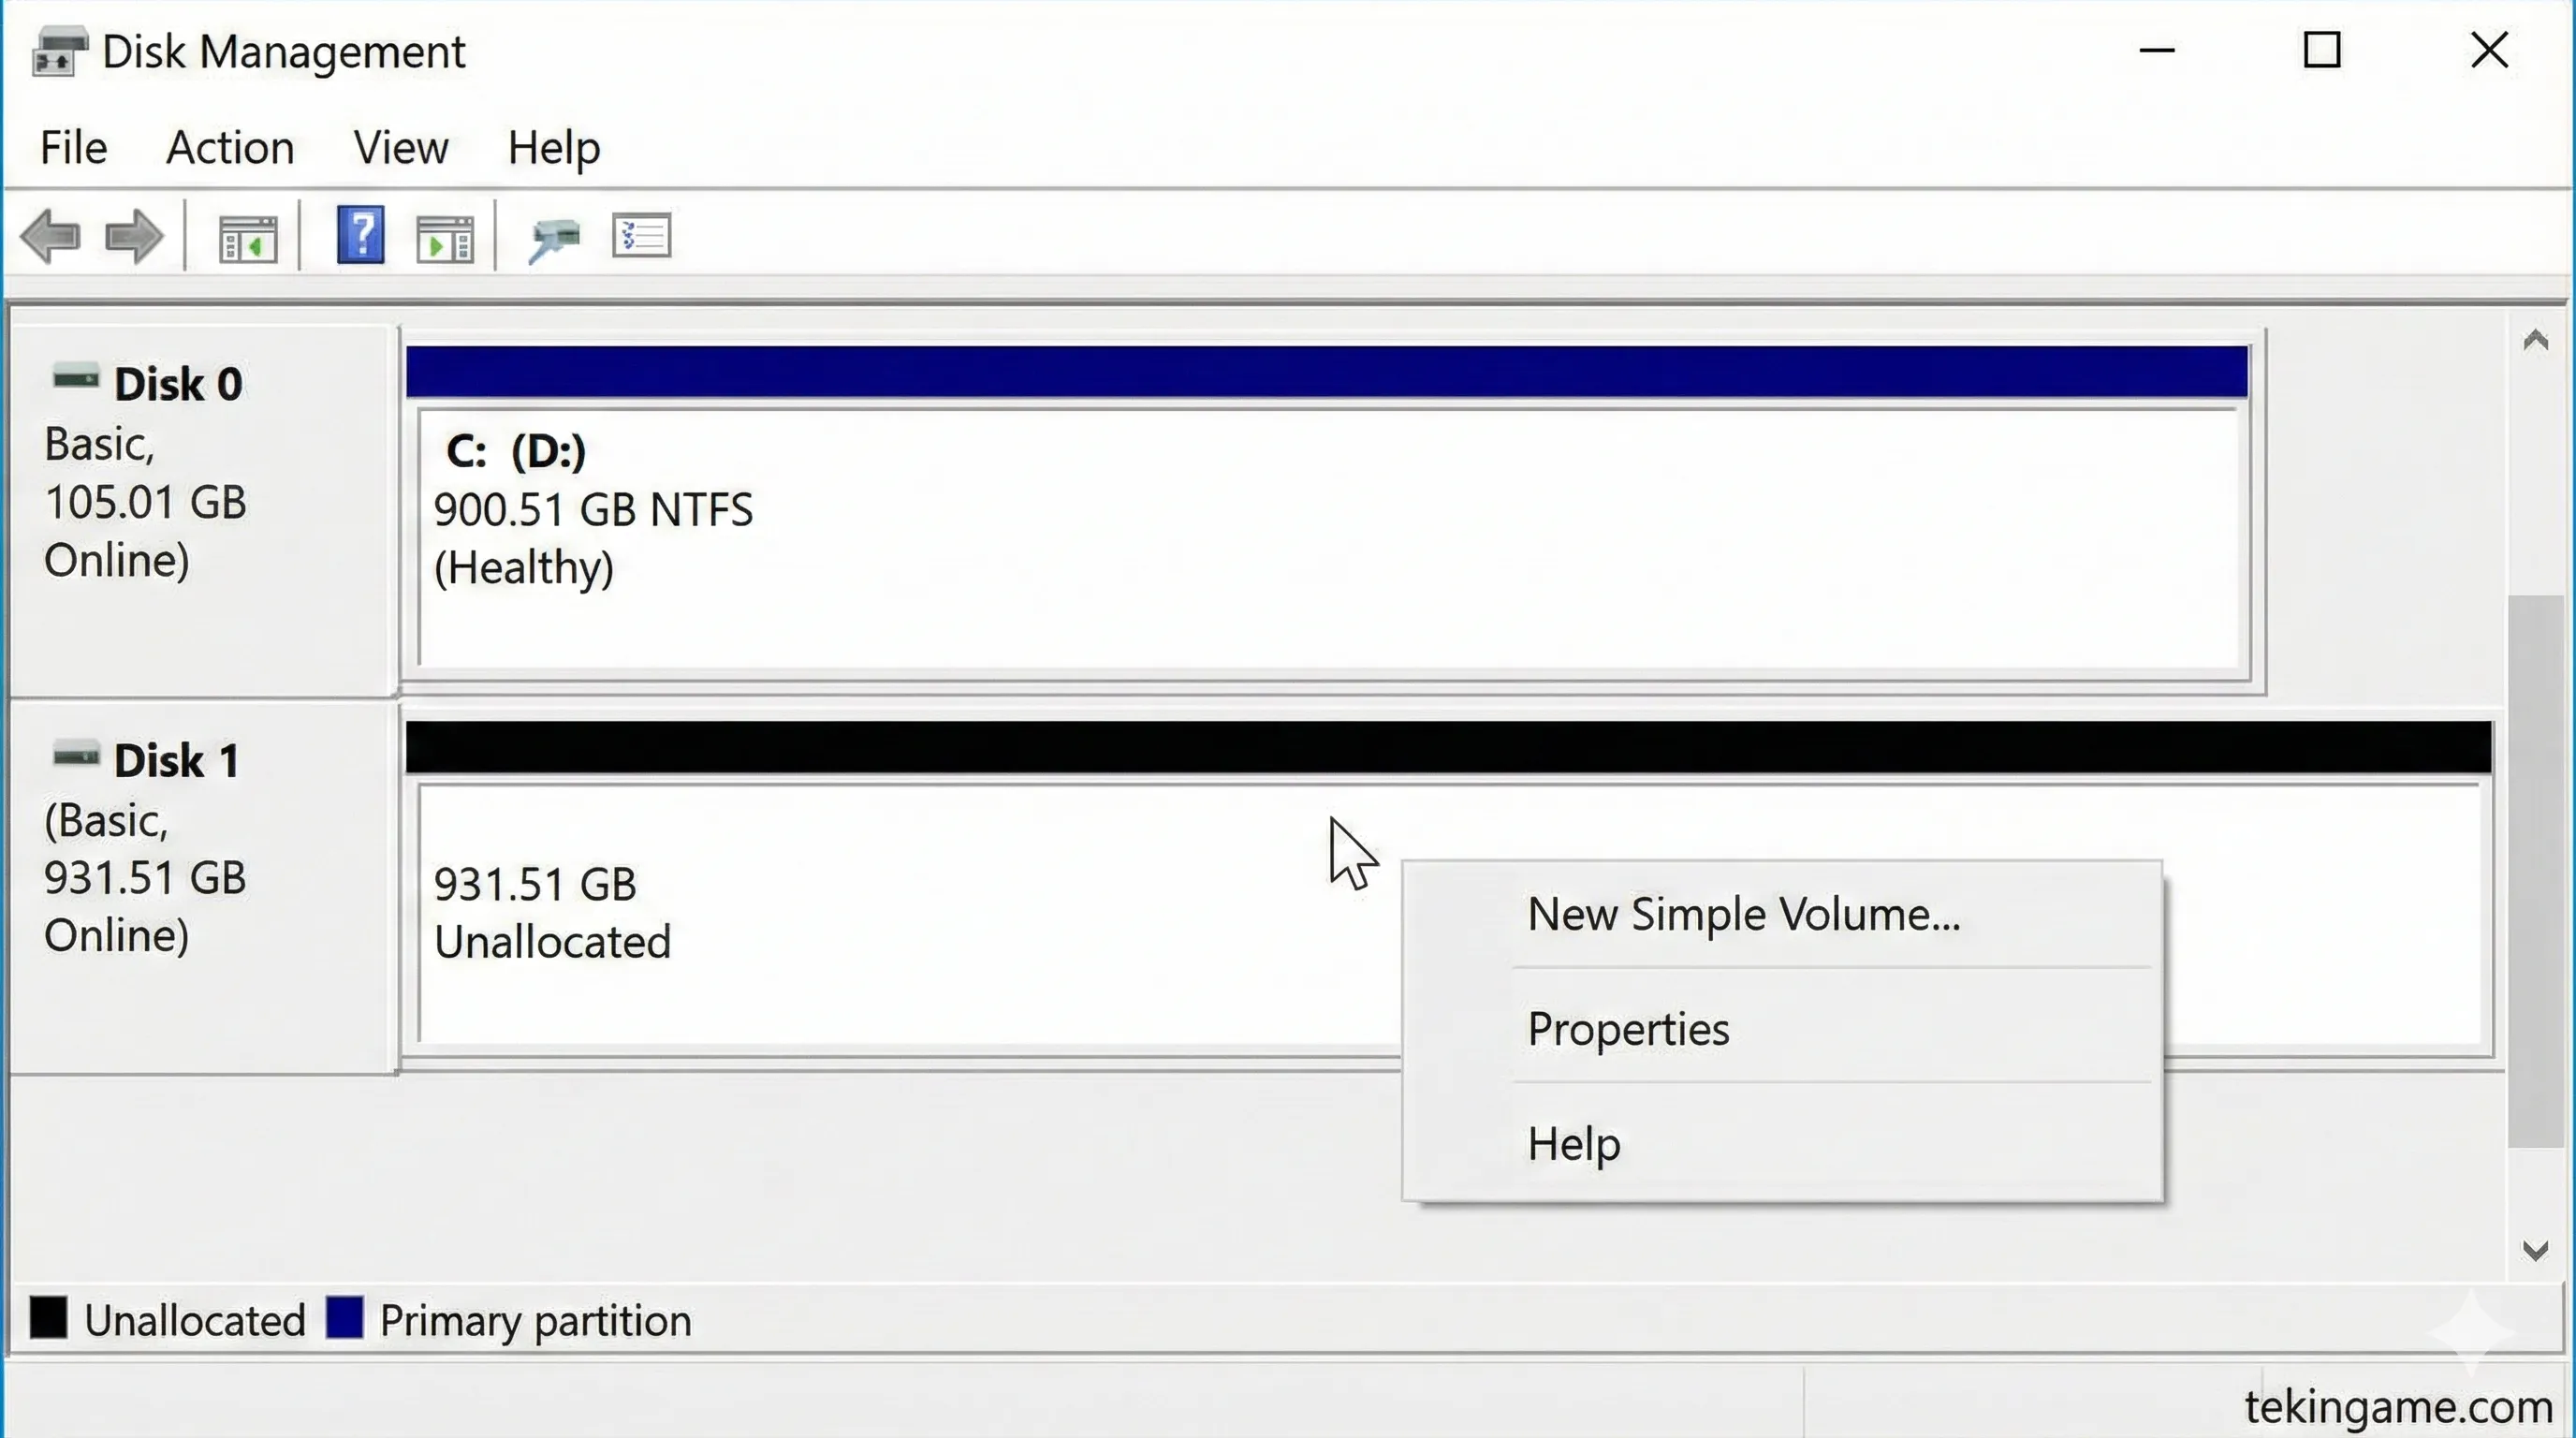
4. The Invisible Drive: Why Isn't My New SSD Showing Up?
This is the #1 question we get in our DMs on Boxing Day.
"I installed the WD Black SSD, but 'This PC' doesn't show it! Is it broken?"
No, it is not broken. It is just uninitialized. A fresh factory drive is like a blank notebook; Windows doesn't know how to write in it yet.
The "Disk Management" Ritual:
- Right-click the Windows Start Button and select Disk Management.
- A popup will immediately appear saying "You must initialize a disk".
- Select GPT (GUID Partition Table). Do not choose MBR; that is ancient technology from the Windows XP era. Click OK.
- Locate your new drive in the list at the bottom. It will have a black bar and say "Unallocated".
- Right-click the black bar area and select New Simple Volume.
- Click "Next" through all the prompts. You can give it a name like "Game Library" if you want.
- The bar will turn blue. Open "This PC", and your new drive (E: or F:) is ready for action.
5. PS5 Owners: The Strategic Transfer
If you bought a Samsung 990 Pro for your PS5 today, simply plugging it in isn't enough.
By default, the PS5 will continue to download new games to the almost-full internal storage, ignoring your shiny new 2TB drive.
Change the Default Landing Zone:
- Go to Settings > Storage > Installation Location.
- Change "PS5 Games and Apps" to M.2 SSD Storage.
- Change "PS4 Games and Apps" to M.2 SSD Storage.
Don't Re-Download! Move Instead:
Do not delete your existing games to download them again on the new drive. That wastes bandwidth.
Go to Console Storage > Games and Apps. Select the "Move" tab. Select games like Call of Duty or GTA V and move them to the M.2 SSD. It is incredibly fast (gigabytes per second) compared to downloading.
Bonus: The Handheld Tweak (Steam Deck / ROG Ally)
Did you get a handheld console? There is one secret setting for you.
These devices share RAM between the system and the graphics. By default, they allocate very little to graphics (VRAM).

- For ROG Ally: Open Armory Crate > Settings > Operating Mode > GPU Settings. Change the VRAM allocation from 4GB to **6GB** or **Auto**. This prevents crashing in VRAM-heavy games like The Last of Us.
- For Steam Deck: You need to enter the BIOS (Volume Up + Power), go to Advanced, and find UMA Buffer Size. Increasing this to 4GB can help performance in specific AAA titles running on Windows.
Commander's Final Checklist
If you followed this guide, your system is now running at 100% efficiency. You are getting every frame and every gigabyte you paid for.
- ✅ Monitor: Set to Max Refresh Rate + HDR Calibrated?
- ✅ RAM: XMP / EXPO Profile 1 Enabled?
- ✅ GPU: Resizable BAR Enabled (Above 4G Decoding On)?
- ✅ SSD: Initialized to GPT?
- ✅ PS5: Installation Location Updated?
Next Step: Now that your machine is a beast, you need games to test it. Check out our morning article to see how to grab Cyberpunk 2077 before the sale ends tonight!